Projets:Finger Starter
De wikilab
| Finger Starter
| |
|---|---|
| Informations | |
| Description | Réaliser un finger starter proposé par Inmoov : finger starter |
| Catégorie | Membre supérieur |
| Etat d'avancement | Réalisés |
| Techniques | |
| Durée de fabrication | |
| Coût matériel | |
| Niveau | |
| Licence | by-sa |
| Date de création | 2021-03-24 |
| Équipe | |
| Porteur de projet | Alix |
| Contributeurs | Alix |
| Fabmanager | Yo |
| Référent documentation | Yo |
| Nom humanlab | Humanlab_MHK |
| Documentation | |
| Statut de la documentation | Partielle |
| Relecture de la documentation | Non vérifiée |

Description du projet
Le projet est de réaliser un finger starter proposé par Inmoov : finger starter
Cahier des charges
Utiliser un kit de capteurs afin de contrôler le finger starter de manière originale.
Analyse de l'existant
http://inmoov.fr/finger-starter/
Equipe (Porteur de projet et contributeurs)
- Concepteurs/contributeurs : Alix
- Fabmanager référent : Yo
- Responsable de documentation : Yo
Matériel nécessaire
- 1 Finger Starter à imprimer en 3D : http://inmoov.fr/finger-starter/
- Des fils de prototypage
- Platine d'essai
- kit de capteurs : electronic component kits
Outils nécessaires
- Un ordinateur
Coût
- - de 50€
Fichiers source
Détail des capteurs : Détail des capteurs
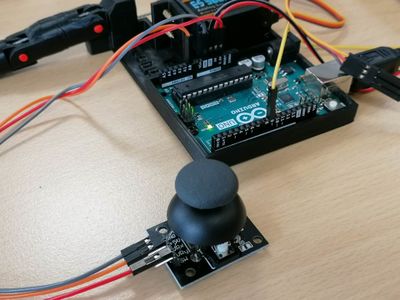
Image des différentes versions réalisée avec le code correspondant
- 1 - Bouton

#include <Servo.h>

Servo myservo;                      // create servo object to control a servo

const int servoPin = 9;             // Digital PWM pin used to control the servo
const int buttonPin = 8;            // Digital pin to attach the button

int val = 0;                        // variable to read the value from the button

void setup() {
  myservo.attach(servoPin);         // attaches the servo to "servoPin"
}

void loop() {
  val = digitalRead(buttonPin);     // gets button current state
  if (val == 0) {                   // checks if the button is pressed
    myservo.write(120);             // lifts finger
  }
  else {
    myservo.write(10);              // lowers finger
  }
  delay(30);                        // waits for servo to get there
}

- 2 - Photo-interrupteur

#include <Servo.h>

Servo myservo;                      // create servo object to control a servo

const int servoPin = 9;             // Digital PWM used to control the servo
const int photoPin = 8;             // Digital pin used to control the photo interruptor

int val = 0;                        // variable to read the value from the photo interruptor

void setup() {
  myservo.attach(servoPin);         // attaches the servo to "servoPin"
}

void loop() {
  val = digitalRead(photoPin);      // reads value from photo interruptor
  if (val == 1) {                   // check if the photo interruptor is blocked
    myservo.write(120);             // lifts finger
  }
  else {
    myservo.write(10);              // lowers finger
  }
  delay(30);                        // waits for servo to get there
}

- 3 - Photorésistance

#include <Servo.h>

Servo myservo;                            // create servo object to control a servo

const int photoResistPin = A0;            // Analog pin used to connect the photo resistor
const int servoPin = 9;                   // Digital PWM used to control the servo

int light = 0;                            // variable to read the value from the photo resistor pin

void setup() {
  myservo.attach(servoPin);               // attaches the servo to "servoPin"
  pinMode(photoResistPin, INPUT);         // puts the photo-resistor pin in INPUT
}

void loop() {
  light = analogRead(A0);                 // reads value from photo-resistor
  light = map(light, 0, 1023, 180, 0);    // scales it to be usable by the servo
  myservo.write(light);                   // sets the servo position according to the value
  delay(30);                              // waits for the servo to get there
}

- 4 - Joystick

#include <Servo.h>

Servo myservo;                            // create servo object to control a servo

const int joystickPin = A0;               // Analog In pin used to connect the joystick
const int servoPin = 9;                   // Digital PWM used to control the servo

int rotation = 0;                            // variable to read the X or Y value from the joystick


void setup() {
  myservo.attach(servoPin);               // attaches the servo to "servoPin"
  pinMode(joystickPin, INPUT);         // puts the joystick pin in INPUT
}

void loop() {
  rotation = analogRead(A0);                 // reads value from joystick
  rotation = map(rotation, 0, 1023, 180, 0);    // scales it to be usable by the servo
  myservo.write(rotation);                   // sets the servo position according to the value
  delay(30);                              // waits for the servo to get there
}